People incorrectly assume that riders into long distance riding often travel significantly faster than posted speed limits. Nothing could be further from the truth. Traveling significantly faster than the speed limit will ultimately get you pulled over to for discussions on "why you were in such a hurry" with the LEO. Time spent at the side of the road, rationalizing your speed to someone who I am certain will be less than sympathetic to your pleading, is not the way to ride long distances. Riding faster than traffic will also result in fatigue much earlier than riding at a normal pace. Keeping the wheels moving and minimizing the number of stops and length of your stops is the way to consistently increase your overall average speed and therefore your distances. Minimizing the number of stops is where auxiliary fuel cells can be useful.
Auxiliary fuel cells come in all kinds of shapes and sizes but there are some rules of construction and size that must be adhered to in order to participate in many long distance rallies. The Iron Butt Associations fuel capacity limit is 11.5 US gallons including the stock capacity of your bikes fuel tank. There are 2 main design styles of fuel tanks: Gravity feed style usually mounted on the pillion seat and the Taildragger style usually mounted at a lower point at the back of the bike.
Gravity feed tanks are by far the most popular style of tank for one obvious reasons: gravity never falls. Disadvantages of gravity feed tanks include a higher center of gravity due to the added weight of the fuel at a relative high point of the bike and the need to remove the tank when you want to ride with a passenger.
Taildragger tanks are generally complex and need some type of electric fuel pump and switch arrangement which can fail. Advantages of a taildragger include a lower center of of gravity and the ability to leave the tank installed with a passenger.
I elected to go with a taildragger style tank on my FJR. Below, I will give a picture overview of my install.
First, let's look at are some pictures of auxiliary fuels tanks installed on the bikes of other long distance riders.
 |
| Taildragger style installed on an 07 FJR belonging to Catfish. Seeing this installation was the inspiration for my install. |
 |
| A very clean install of a gravity feed tank on an FJR. |
 |
| An alternative to an Aux Fuel tank is to modify the existing bike tank. |
 |
| Thane Silliker's custom gravity tank on his ST1100 at the start of the 09 IBR (Thane is a great Canadian LD Rider!!). |
 |
| One of the nicest aux fuel tanks I have ever seen on Jeff Earls BMWK1200GT. Left side of the tank was for water and the right side was for fuel. |
 |
| Gravity feed tanks on Jennyfer Audet's and Jacques Titilo's sport bikes at the start of the 09 IBR. |
Ok lets look at the installation of my taildragger tank on my 2007 Yamaha FJR. The tank is the Sampson Taildragger. I purchased it directly from Ron. Ron was incredible and willing to customize the tank as needed. The tank is made of aluminum and the workmanship is amazing. The tank capacity is 4.4 US gallons bringing my total fuel capacity to 11 gallons when combined with the 6.6 gallon stock tank on the FJR. The 11 gallons is less than the 11.5 gallons permitted by the Iron Butt Association. However, I am very happy with my current range of about 400 miles.
 |
| Side view of my Sampson Taildragger tank. I had a bracket installed on the top of the tank to hold a flashlight. Very handy and quick access for hunting bonuses in the dark. |
 |
| Rear view of the Sampson Taildragger tank. Note the LED flashing Hyperlights on either side of the licence plate. |
 |
| All the plastic should be removed prior to installation. Note the length of the rear fender which needs to be cut. |
 |
| The rear fender was cut just below the licence plate light...... I was a little nervous making the cut and measured many times. I used a Dremel tool to make the cut. |
 |
| A view from the top of the area under the passenger seat. You can see two slots that I had to cut to for the top brackets. |
 |
| NOS Low Pressure Fuel Pump Part # 15760NOS. Not cheap but excellent quality. |
 |
| Just enough room under and behind the rear seat to install the pump and solenoid valve |
 |
| A view from the top showing the location of the pump and solenoid valve. |
 |
| Another view of pump and valve installation |
 |
| Tank installed and fuel line routed through hole drilled previously. |
 |
| Fuel line connected to bottom of aux tank and a fuel filter added. |
 |
| The stock tank must be removed to install the bulkhead fitting which connects the aux tank to the main tank. |
 |
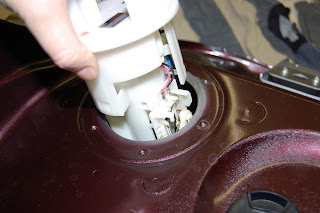
| Fuel pump needs to be removed to gain access. |
 |
| Some tape protects the hand from the sharp edges. |
 |
| Use a step drill bit to for the bulkhead fitting and mark the correct diameter. |
 |
| Bulkhead fitting purchased from Sampson Sport Touring |
 |
| Location of drilled hole for bulkhead fitting. I passed a small yogurt container into the tank and taped it under the location of the drilled hole to catch all the metal filings. |
 |
| Another view of location of drilled hole for the bulkhead fitting |
 |
| Quick Disconnect purchased from Sampson Sport Touring to permit removal of gas tank. |
 |
| Bulkhead fitting installed with quick disconnect. Later I decided to length the fuel line by 2 inches to provide easier access to the operate the quick disconnect. |
 |
| Routing of fuel line and quick disconnect. |
 |
| Top view of installation. |
 |
| Indication light installed on my dash when to remind me when system is turned on. |
I have had the auxiliary fuel system installed for about 30,000 trouble free miles. Helpful hint: I carry a spare female quick disconnect in my tool bag along with some PVC tubing so that I can quickly tie into the main fuel tank to drain gas or to help a fellow rider in need of gas.


